Click for the instruction video for the ONE siphon
Click for the cleaning instructions for the ONE siphon Click for the cleaning instructions for the PRO siphon

A brush is provided in the box of the I-DRAIN® AIO, which is ideal for cleaning the built-in AIO siphon.

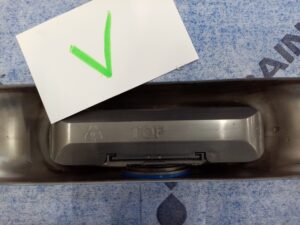
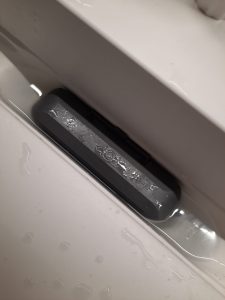
The word “TOP” should be visible for proper placement.
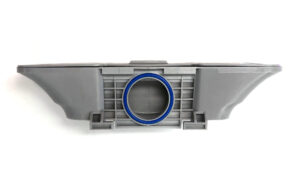
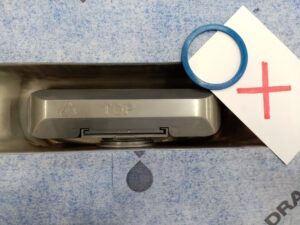
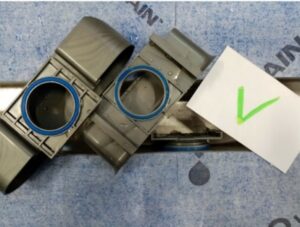
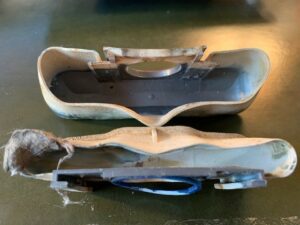
First and foremost, check the sealing rings on the siphon.
The outer sealing ring of the siphon must be round, and the inner sealing ring must be flat. If both rings are flat, all you have to do is tell your dealer. You will receive a new siphon with the correct sealing rings without any quibble. By replacing your old siphon with a new one, this should rule out the possibility of unpleasant smells. The siphon refills with water after every wash, and there is no smell.
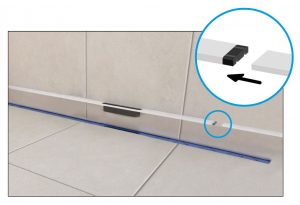
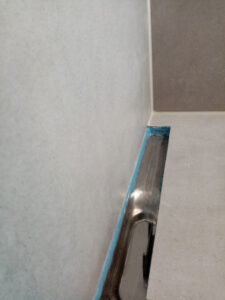
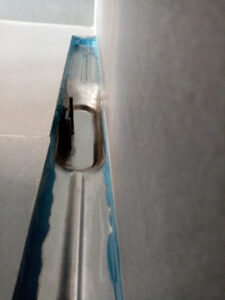
Silicone sealant completely around the drain without interruption?
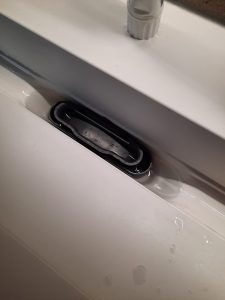
Check whether the water level at the siphon is sufficiently filled. If your siphon is half submerged, fill your bath, another sink or flush the toilet.
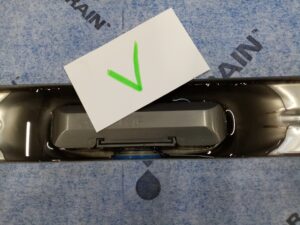

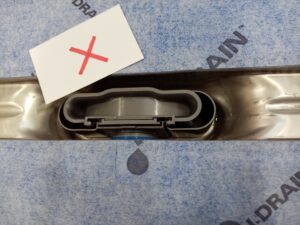
Check that the siphon is not installed upside down, is the word ‘TOP’ visible?
Check that the siphon is not installed crookedly.

Inner screw not tight enough.
Click for video for correct placement of the inner screw.
Click for the video for wrong placement of the inner screw.
Clear your hair strainer.
Clear your strainer weekly.
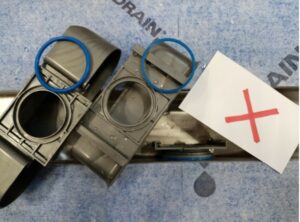
Floating siphon.
This problem only occurs with the first generation of I-Drain with the thin O-ring. The current siphons are fitted with a thick modified O-ring. In such case, we simply send a new adapted siphon under service.
This problem only occurs with the first generation of I-Drain with the thin O-ring. The current siphons are fitted with a thick modified O-ring. In such case, we simply send a new adapted siphon under service. (see “What to do if there is an unpleasant smell”).
Don’t jump to the conclusion that something is wrong with the I-Drain siphon.
It is probably a ventilation problem in your piping!
Thanks to our years of experience, we know that most drainage problems are due to ventilation problems in the pipes.
You can perform a simple test! If the water runs away smoothly if you remove the siphon from the drain, then you can be almost certain that you are dealing with a ventilation problem.
In the event of a ventilation problem, an air bubble is trapped in a bend in the pipework. This air bubble is reducing the drainage capacity, because the pipe cannot fill completely with water. A half-full pipe only drains away half as much water. In a perfectly ventilated pipe system, the air bubble always has the possibility of escaping. In a case of poor ventilation, it has nowhere to go.
Below, you will find a summary of the ideal composition of your pipe system and of a number of common installation errors that can cause poor ventilation.
How can I solve this ventilation problem:
The only solution for the ventilation problem is to install another siphon (with a goose-neck) somewhere else in the home (e.g. in the cellar). It is advisable to contact the installer directly about this. He will examine the problem with you, and advise you based on his experience.
Figure 1 and 2 show how the house sewerage system should be ventilated correctly.
Figure 1: individually
All drain pipes are connected separately to the fall pipe / standpipe.
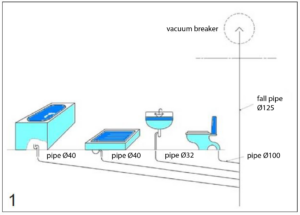
Figure 2: Collector.
It is more usual, as well as saving costs and space, for several drain pipes to be connected to the collector pipe (with ventilation) and that this collector is connected to the fall pipe/standpipe. Of course, the collector also has to be ventilated by a ventilation pipe.
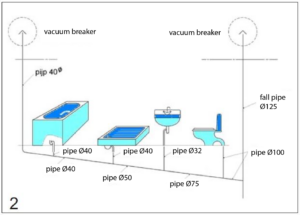
Combinations of both methods are possible. For optimum drainage, it is recommended to take the following points into account:
The connection of the toilet:
For optimum drainage, it is best to connect the toilet separately to the main fall pipe, preferably with a 45° bend instead of a 90° bend (if necessary, make two 45° bends).
Mount 45° bend directly on the external screw part
Normally, the socket must be attached to the external screw part of the siphon in order to make the connection to the drain. In some cases it may happen that there is no space to place a sleeve and that you wish to work directly with a bend. A 45° bend can be mounted directly on the outer screw part. This will also not pose a problem for the discharge capacity (depending on the capacity of the supply). One should always take into account the more one is going to work with bends, the less drainage capacity one will have. If a bend of 45° is to be placed directly on the external screw part, we must work with a rubber seal and the whole may not be glued. Because when tightening, you have to put force on this and if you are going to glue the whole, there is a chance that it will still come loose. Therefore, always work with a rubber seal, so that the whole can be tightened properly and that it is secured.
Connection of both a shower and a bath:
When emptying the bath, it sometimes happens that the bathwater flows into the shower via the shower drain, causing it to overflow. This phenomenon occurs if the diameter of the collector pipe is too small. The shower and the bath then act as communicating vessels, which always try to maintain the same water level. In that case, you would be well advised to connect the shower separately to the main fall pipe.
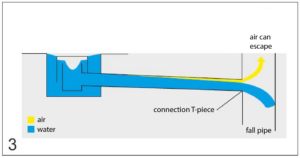
The connection of the collector to the fall pipe:
It is recommended to use a T-connector to connect the pipes to the main fall pipe, as you can see in Figure 3. Via the T-connector, the air can escape from the pipe and optimal drainage capacity can be guaranteed for the pipe.

Incorporation of bends > transition from 40mm to 50mm:
In the horizontal area, it is advisable not to incorporate any bends. Every bend increases the risk of air bubbles that stay in the pipe. If you do incorporate them, then fit a transition from 40 mm to 50 mm and even install the bend with a 50 mm diameter pipe.
Min. length widening from 40 to 50mm
Should always be done after max. 1 meter or before a bend. There is no minimum length because you can actually switch directly to diameter 50, but then you have to work with an eccentric sleeve and never glue one with a rubber sealing ring. Because when tightening, you have to put force on this and if you are going to glue the whole, there is a chance that it will still come loose. Therefore, always work with a rubber seal, so that the whole can be tightened properly and that it is secured. But you have to see because you switch directly at the beginning to diameter 50, the sleeve will also rise a few mm – so be careful with chapping – hence the eccentric sleeve. And it is possible to work with bends, but it is always best to work with bends of 45° instead of 90° (due to drainage cap.). So theoretically it is best to only go from 40 to 50 after 25 cm.
Of course, the entire piping must always be in a downward gradient.
Look at “Wat do I do if the water stops running away”.
Yes, if this is not the case, the siphon can be emptied, resulting in an aeration problem and odor nuisance.
- Solvents such as acetone…
- Chemical products such as grout residue remover, drain unblockers, …
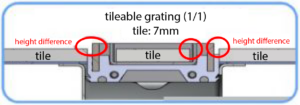
In the new tileable grating, you can lay the same tiles as those that you used for the rest of your bathroom floor. However, you need to make sure that your tiles are not too thick or too thin for the grating.
The minimum thickness = 0.9 cm
The tileable grating is suitable for tiles that are more than 0.9 cm thick. If the tile is less than 0.9 cm thick, the profile in which you install the tile will project above the tile surface.
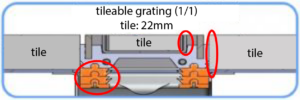
On this second illustration, the height of the tile is equal to the height of the tile profile. So it can be fitted effortlessly and does not require cutting.

If you are working with very thick tiles of 2 cm, for example, the tile will have to be cut thinner and the grating will have to be raised with the elevation blocks, purely for aesthetic reasons.
The level-3 grating has been developed to optimally fit into flowing materials with ultra-thin floor coverings such as epoxy, Novilon and mosaic. The Level-3 is an exceptionally low grating that protrudes just 3mm above the surface. In this way, your installer will never come to the unpleasant conclusion that he has installed a drain with a grating that is too high.
The biggest difference is the installation height, 54 or 72mm. As a result, the properties differ with each model.
Linear 54
- Mounting height: 54 mm
- Water seal height: 30 mm
- Connection diameter: 40 mm
- Flow capacity: 27,5 l/min.
Linear 72
- Mounting height: 72 mm
- Water seal height: 50 mm
- Connection diameter: 50 mm
- Flow capacity: 33,5 l/min.
Your choice depends on:
- The way the tiles are installed
- Glue the tiles to the screed = Linear drain because the waterproofing fabric is already pre-assembled during production.
- Tile directly into the screed/screed = Chape drain because this drain contains a flood defense edge.
- Epoxy floor finish = Chape drain + the Level-3 grid
This is possible with the Linear I drain. This drain has passed the Newton test. The floor installer should then be contacted about this before installation.
- Epoxy
Chape drain x Level-3 grating
If you want to combine the I-Drain with an Epoxy finishing floor, we recommend that you use the Chape drain in combination with the Level-3 grating. You use chape drain because you are working with a cast finishing floor, Level-3 because the finishing floor is very low and this is our thinnest grating. The Chape drain is not equipped with a waterproofing membrane but instead has a water barrier. Thanks to this water retaining ring, the Chape drain can be placed directly in the mortar and is ideal for cast floors. The Level-3 grating has been developed to optimally fit into flowing materials with ultra-thin floor coverings such as epoxy, Novilon and mosaic. The Level-3 is an exceptionally low grating that protrudes just 3mm above the surface. In this way, your installer will never come to the unpleasant conclusion that he has installed a drain with a grating that is too high.
- Wedi plates
Linear drain x (grid depending on the thickness of the plate and tiles to be glued on it)
The membrane can be glued to the polystyrene plates with the prescribed tile adhesive or a polymer adhesive. The drain can then simply be placed in a recess in the insulation board.
- Concrete plex
Linear drain x (grid depending on thickness)
Glue the membrane with polymer Ottocol – no guarantee!!! Staple the membrane to the plate first, then it is mechanically attached, then glue the 2nd membrane over it. We also do not offer a 100 % guarantee for this because the surface is uncertain and we also do not know whether the top plate has good adhesion.
- Vinyl floor
Chape drain x Level-3 grating
Possibly with our Chape drain and the level-3 grating. Not with the Linear drain because the glue used to apply the vinyl floor can cause the cloth to come loose from the drain because it can contain certain caustic products. But for this, one should contact the manufacturer for the gluing of this floor. He must indicate which glue is compatible with the gutter (stainless steel 316). The Chape drain is not equipped with a waterproofing membrane but instead has a water barrier. The Level-3 grating has been developed to optimally fit into flowing materials with extremely thin floor coverings. The Level-3 is an exceptionally low grating that protrudes just 3mm above the surface. In this way, your installer will never come to the unpleasant conclusion that he has installed a drain with a grating that is too high.
- PVC floor
Chape drain unsanded x Level-3 grating
Possible with our Chape drain and the Level-3 grating. However, you should contact the manufacturer for the bonding of this floor. He must indicate which glue is compatible with the gutter (stainless steel 316). Now the screed drains contain a specially developed weir edge that eliminates any risk of leakage. This keeps the water within the periphery of the gutter, and this without a waterproofing membrane. During installation, the floor will go over the gutter and afterwards the recess where the grating should be fitted must be cut out.
- EPDM floor
Chape drain unsanded x Level-3 grating
Never work with the Linear drain here because we have absolutely no experience with this. And we also do not know how the bonding of the EPDM reacts to the bonding of our membrane to the stainless steel. The only option here is to work with our Chape drain, but the UNSANDED version! And the EPDM must then be glued water-resistant to the stainless steel flange. To do this, contact the manufacturer for the bonding of this floor. He must indicate which glue is compatible with the gutter (stainless steel 316).
Always use a rapid-set, flexible, waterproof tile adhesive (NEN EN 12004C2).
This is not the purpose and sealing with silicone is not a permanent solution, we cannot guarantee that this will remain waterproof in the long term. The waterproofing membranes need a minimum overlap of 6cm.
Solution:
Customer should consult the installer to obtain a long lasting solution.
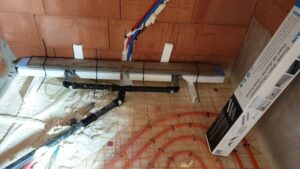
Underfloor heating and PVC pipes do not go well together. Underfloor heating can only be used if the drain is well insulated.
Alternative solution:
Install heat-resistant plastic waste pipes (the same as those used for the washing machine). The I-buddy/installation block sufficiently insulates the I-drain for underfloor heating.
A unique feature of the I-Drain® AIO is that it has both a horizontal (with AIO siphon) and vertical (without siphon) connection.
The grating can easily be shortened with the supplied cutting disc.
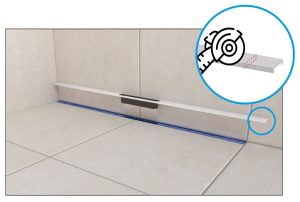
The grating can easily be extended thanks to the extension sets. These must be purchased separately.